Jupyter Widgets: The Good Parts
This page is largely adapted from “Building a Custom Widget” in the Jupyter Widgets documentation. I’d hoped to avoid separately documenting the Jupyter Widgets API, but their tutorial mixes boilerplate/packaging details with core “concepts” to Jupyter Widgets. Below is an attempt to distill these concepts for anywidget authors.
Watch & Learn
This video provides a practical guide to anywidget fundamentals, including synchronizing Python and JavaScript state, binary data, animations, and publishing a package on PyPI.
More detailed explantations of specific widget concepts are included below.
The Widget Front End
This section frames the Jupyter Widgets documentation in the context of anywidget. Remember that anywidget is just abstraction over traditional Jupyter Widgets that removes boilerplate and packaging details.
Comparison with traditional Jupyter Widgets
anywidget simplifies creating your widget’s front-end code. Its only
requirement is that your widget front-end code is a valid
JavaScript module
and exports initialize or render widget lifecycle hooks.
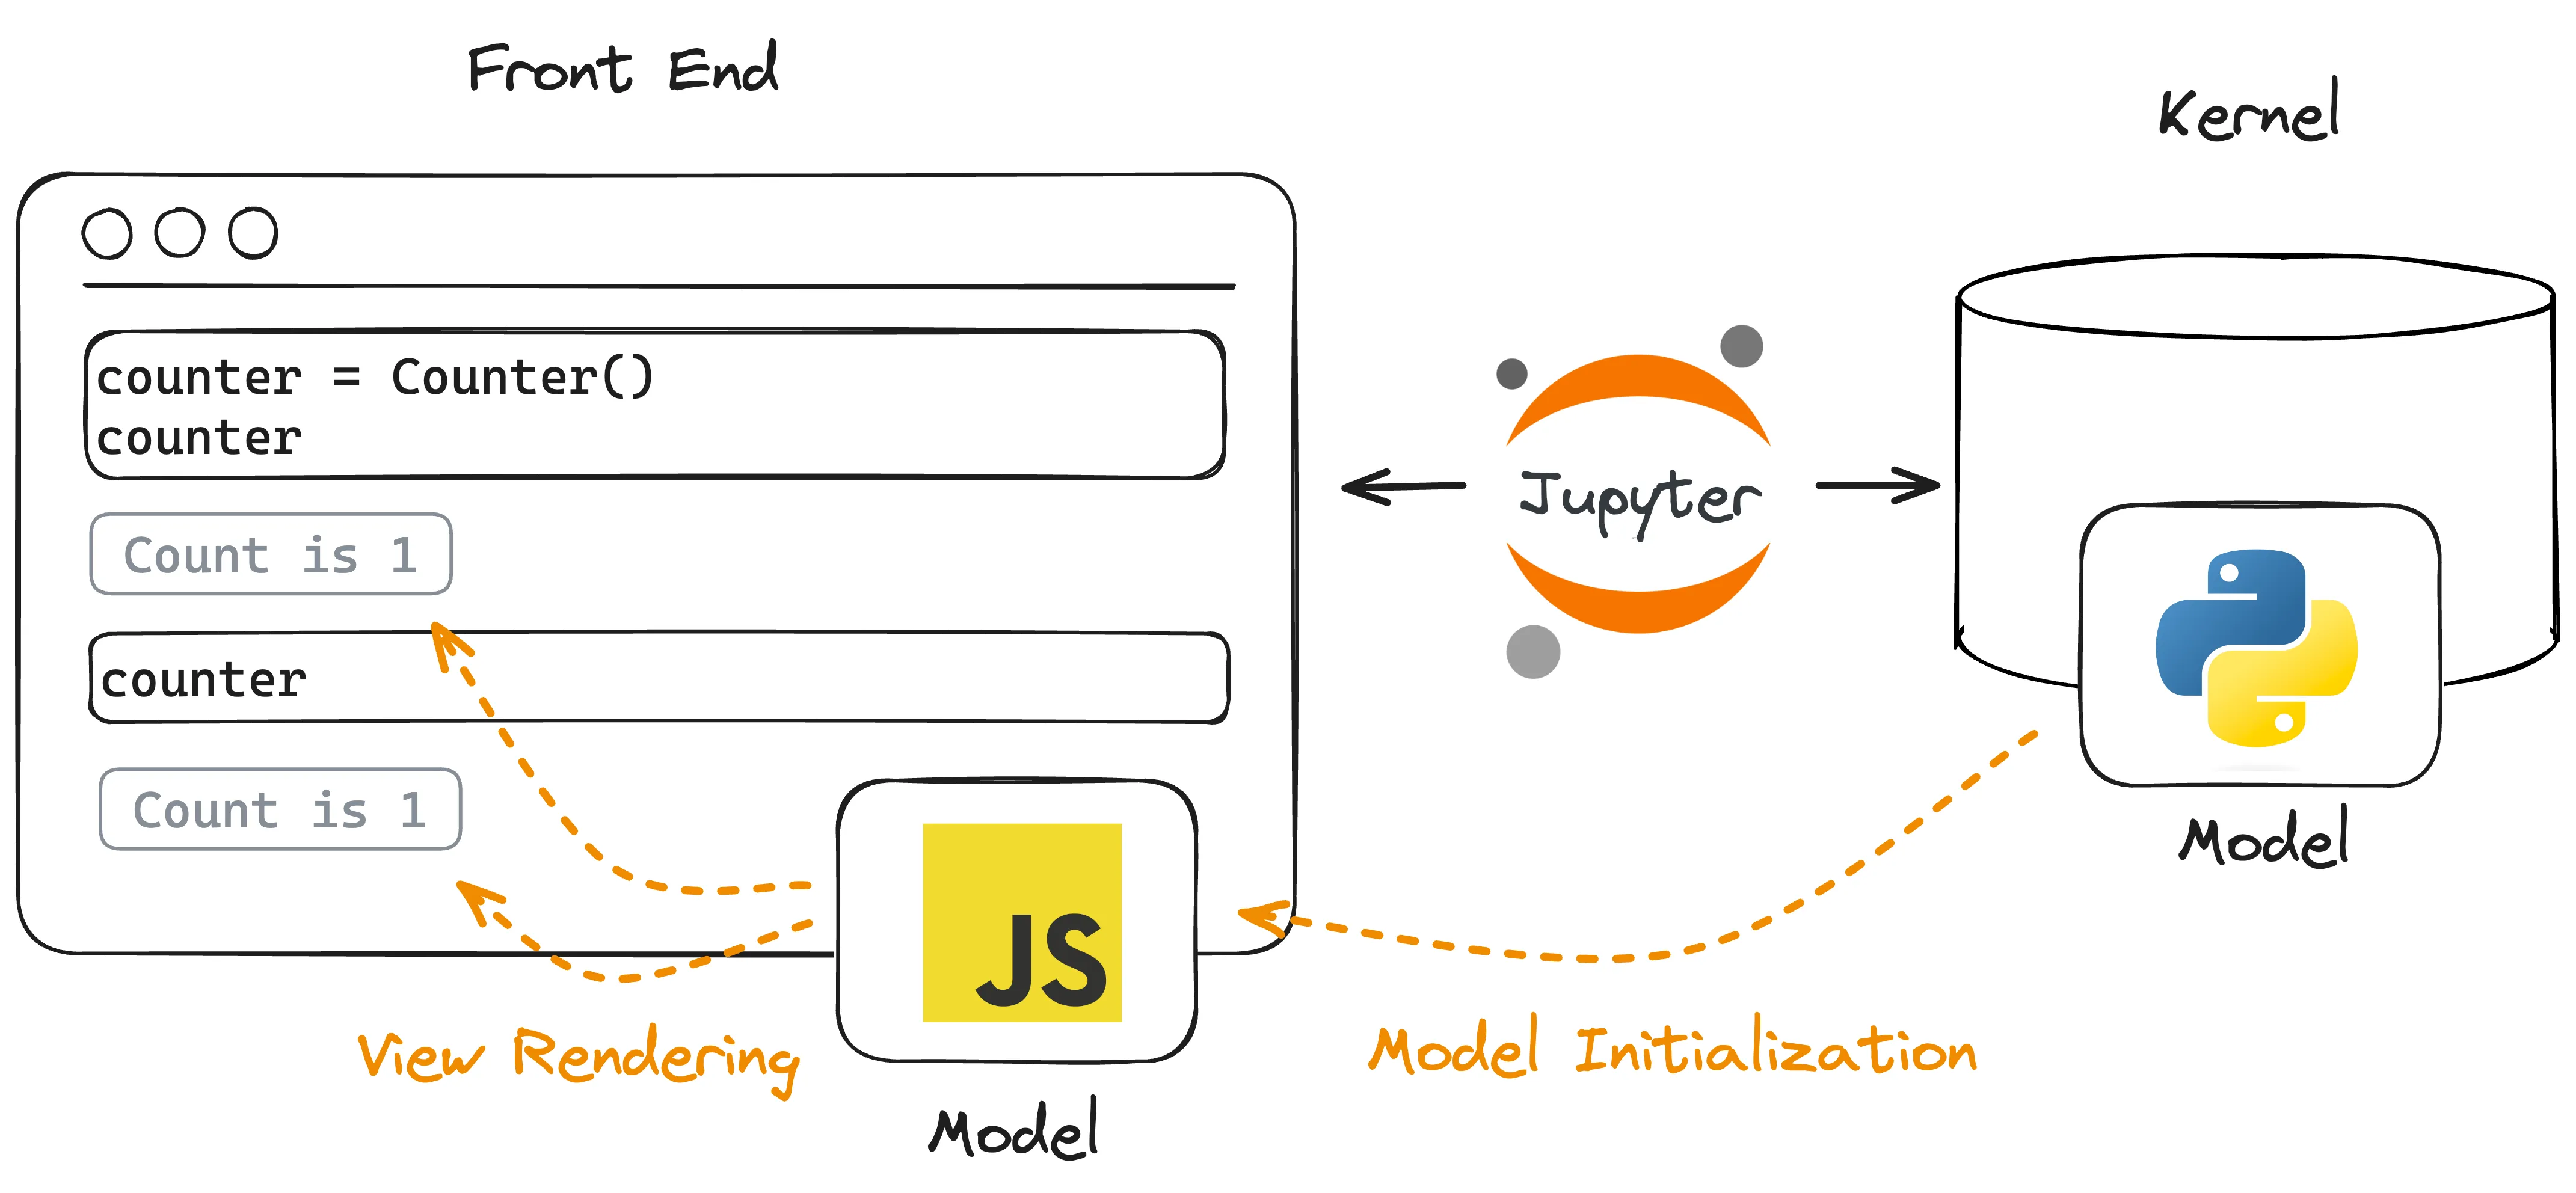
Hooks correspond to specific stages in the lifetime of a widget:
- Model Initialization: On instantiation in Python, a matching front-end model is created and synced with a model in the kernel.
- View Rendering: Each notebook cell displaying the widget renders an independent view based on the model’s current state.
The initialize hook is similar to
DOMWidgetModel.initialize,
which is used for the model initialization, and the render hook is similar
to
DOMWidgetView.render,
which is used for view rendering.
Concretely, custom widgets are traditionally defined like:
import { DOMWidgetModel, DOMWidgetView } from "@jupyter-widgets/base";

class CustomModel extends DOMWidgetModel {
  /* ... */
}

class CustomView extends DOMWidgetView {
  render() {
    let el = this.el;
    let model = this.model;
    /* view logic */
  }
}

export { CustomModel, CustomView };
… which must be transformed, bundled, and installed in multiple notebook environments.
In anywidget, the above code simplifies to:
/** @param {{ model: DOMWidgetModel, el: HTMLElement }} context */
function render(context) {
  let el = context.el;
  let model = context.model;
  /* view logic */
}

export default { render };
… which defines view rendering logic in render functions.
anywidget front-end code is often so minimal that it can easily be inlined as a Python string:
class CustomWidget(anywidget.AnyWidget):
    _esm = """
    function render(context) {
      let el = context.el;
      let model = context.model;
      /* ... */
    }
	export function { render };
    """
In anywidget, developers define view rendering logic with render, but
model initialization is usually handled automatically by the framework.
Automatic model initialization is sufficient for most widgets, but
sometimes it can be useful to run custom logic when the front-end model is first
created. For example, a widget might need to register an event handler just
once or create some state to share across views.
In this case, you can also implement initialize to define model
initialization logic:
/** @param {{ model: DOMWidgetModel }} context */
function initialize({ model }) {
  /* (optional) model initialization logic */
}

/** @param {{ model: DOMWidgetModel, el: HTMLElement }} context */
function render(context) {
  let el = context.el;
  let model = context.model;
  /* view logic */
}

export default { initialize, render };
The render function
Just like DOMWidgetView.render, your widget’s render function is executed
exactly once per output cell that displays the widget instance. Therefore,
render primarily serves two purposes:
- Initializing content to display (i.e., create and append element(s) to
context.el) - Registering event handlers to update or display model state any time it
changes (i.e., passing callbacks to
context.model.on)
Connecting JavaScript with Python
The Jupyter Widgets framework is built on top of the IPython Comm framework (short for communication). It’s worth reading the Low Level Widget Explanation to understand the core of Jupyter Widget’s Model, View, Controller (MVC) architecture, but in short the Comm framework exposes two mechanisms to send/receive data to/from the front end:
1. Traitlets
traitlets
are the easiest and most flexible way to synchronize data between the front end
and Python. The sync=True keyword argument tells the widget framework to
handle synchronizing that value to the front end. Take the following
CustomWidget:
class CustomWidget(anywidget.AnyWidget):
    _esm = pathlib.Path("index.js")
    my_value = traitlets.Int(0).tag(sync=True)
It defines an Integer my_value trait, which is synchronized with the front
end. The render function now has the ability to:
- get
my_value
// index.js
function render({ model, el }) {
  let my_value = model.get("my_value");
}
export default { render };
- set
my_value
// index.js
function render({ model, el }) {
  model.set("my_value", 42);
  model.save_changes(); // required to send update to Python
}
export default { render };
- listen for changes to
my_value(and register event handlers)
// index.js
function render({ model, el }) {
  function on_change() {
    let new_my_value = model.get("my_value");
    console.log(`The 'my_value' changed to: ${new_my_value}`);
  }
  model.on("change:my_value", on_change);
}
export default { render };
Note: In the snippet above,
on_changeis called an event handler because it executes any timemy_valueis updated from either Python or the front-end code (i.e., a change event).
An important aspect of traitlets, and their first-class support in Jupyter Widgets, is that it is easy to compose Jupyter Widgets together in Python. For example,
import ipywidgets

# create a custom widget
widget = CustomWidget()

# link a slider widget with our custom widget
slider = ipywidgets.IntSlider()
ipywidgets.link((widget, "my_value"), (slider, "value"))

# log the value of `my_value` any time it changes
output = ipywidgets.Output()
@output.capture()
def handle_change(change):
    """Prints new value to `output` widget"""
    print(change.new)
widget.observe(handle_change, names=["my_value"])

ipywidgets.VBox([slider, widget, output])
It doesn’t matter if our widget is updated from JavaScript or Python, the IPython framework ensures it stays in sync with all the different components.
2. Custom messages
A second mechanism to send data to the front end is with custom messages. Within
your render function, you can listen to msg:custom events on the model.
For example,
class CustomMessageWidget(anywidget.AnyWidget):
    _esm = """
    function render({ model, el }) {
      model.on("msg:custom", msg => {
         console.log(`new message: ${JSON.stringify(msg)}`);
       });
    }
	export default { render };
    """

widget = CustomMessageWidget()
widget # display the widget
# send message
widget.send({ "type": "my-event", "foo": "bar" })

# Browser console:
# new message: '{ "type": "my-event", "foo": "bar" }'
Warning: Custom messages are only received if your front-end code has executed (i.e., the widget is displayed before sending messages). Changing the order of calls in the snippet above:
widget = CustomMessageWidget()

# send message, but no event listeners!
widget.send({ "type": "my-event", "foo": "bar" })

# displays widget (starts listening for events)
widget
Data Types
A common misconception about widgets is that they only support
JSON-serializable data. However, the Jupyter Widgets Messaging
Protocol
supports custom binary data as well. Both anywidget and ipywidgets
automatically pack and unpack custom binary data from otherwise
JSON-serializable builtins (e.g., dict, list, set, etc.) when (de)serializing
the model state. This ensures that you can safely pass binary data to (and from) the front
end without additional overhead (e.g., converting to JSON or base64 encoding).
Here’s a summary of how Python data types are mapped to JavaScript types (and vice versa):
| Python | JavaScript |
|---|---|
str | string |
float | number |
int | number |
bool | boolean |
dict | object |
list | set | Array |
bytes | bytearray | memoryview | DataView |
You might be curious how traitlets come into play with data types. Although
ipywidgets are deeply tied to traitlets, it’s just a library to help with
validation and custom serialization if necessary. Ultimately, all data sent to
the frontend must match a Python data type in the table above.
class Widget(anywidget.AnyWidget):
    _esm = """
    function render({ model, el }) {
      console.log(model.get("my_str"));    // "Hello, World!"
      console.log(model.get("my_float"));  // 3.14
      console.log(model.get("my_int"));    // 42
      console.log(model.get("my_bool"));   // true
      console.log(model.get("my_dict"));   // { foo: "bar", bar: 42 }
      console.log(model.get("my_list"));   // [ "foo", "bar", 42 ]
      console.log(model.get("my_set"));    // [ "foo", "bar", 42 ]
      console.log(model.get("my_bytes"));  // DataView(13)
    }
    export default { render };
    """
    my_str = traitlets.Unicode("Hello, World!").tag(sync=True)
    my_float = traitlets.Float(3.14).tag(sync=True)
    my_int = traitlets.Int(42).tag(sync=True)
    my_bool = traitlets.Bool(True).tag(sync=True)
    my_dict = traitlets.Dict({"foo": "bar", "bar": 42}).tag(sync=True)
    my_list = traitlets.List(["foo", "bar", 42]).tag(sync=True)
    my_set = traitlets.Set({"foo", "bar", 42}).tag(sync=True)
    my_bytes = traitlets.Bytes(b"Hello, World!").tag(sync=True)
The specific traitlets above just provide validation on the Python side.
Alternatively, you can use traitlets.Any to avoid validation, and
the data will still be serialized to the front end according to the table above.
class Widget(anywidget.AnyWidget):
    _esm = """
    function render({ model, el }) {
      model.on("change:whatever", () => {
        console.log(model.get("whatever"));
      })
    }
    export default { render };
    """
    whatever = traitlets.Any().tag(sync=True)

w = Widget()
w
w.whatever = "Hello, World!"            # "Hello, World!"
w.whatever = 3.14                       # 3.14
w.whatever = 42                         # 42
w.whatever = True                       # true
w.whatever = {"foo": "bar", "bar": 42}  # { foo: "bar", bar: 42 }
w.whatever = ["foo", "bar", 42]         # [ "foo", "bar", 42 ]
w.whatever = {"foo", "bar", 42}         # [ "foo", "bar", 42 ]
w.whatever = b"Hello, World!"           #  DataView(13)
Custom Serialization
A custom serializer for a trait can be defined in the form of a to_json hook
that is passed as trait metadata. The hook must return one of the types listed in the Data
Types table.
For example, let’s serialize a pathlib.Path to it’s file contents:
import pathlib

def path_to_json(path: pathlib.Path, widget: anywidget.AnyWidget):
    # `widget` is the Widget instance, but unused in this example.
    #  It's useful for accessing other state when serializing.
    return {
      "name": path.name,
      "contents": path.read_bytes(),
    }

class Widget(anywidget.AnyWidget):
    _esm = """
    function render({ model, el }) {
      console.log(model.get("my_path"));
      // { name: "example.txt", contents: DataView(13) }
    }
    export default { render };
    """
    my_path = traitlets.Instance(pathlib.Path).tag(
        sync=True, to_json=path_to_json
    )

Widget(my_path=pathlib.Path("example.txt"))
The to_json hook is called whenever the Widget.my_path changes, and the
return value is sent to the front end.
A more complex serialization example might be to serialize a pandas.DataFrame
to the Apache Arrow format or a numpy array to
its underlying bytes. Several community examples should serve as
good starting points to learn about more advanced use cases.
Tips for beginners
anywidget is a minimal layer on top of Jupyter Widgets and explicitly avoids inventing new concepts or widget APIs. Its design allows widget authors to have nearly the same low-level control over their Jupyter integrations, but this flexibility can be intimidating and confusing to new widget authors.
Here are some general recommendations for being productive with anywidget:
-
Start small. Jupyter Widgets combine many concepts and tools from JavaScript and Python. Unlike traditional widgets, anywidget allows you to learn both ecosystems incrementally. Start with a minimal example, and slowly add new functionality. Change traitlets. Update model state from JavaScript, then update model state from Python. Add an event handler. It’s a great way to learn.
-
Learn to identify ECMAScript modules (ESM). ESM is the core technology used by anywidget, and a deeper understanding will help you discern what is and (perhaps more importantly) is not standard JavaScript. I recommend reading Lin Clark’s “ES modules: A cartoon deep-dive” to learn more.
-
Prefer Traitlets over custom messages for state synchronization. Widget state can be fully recreated from traits without Python running, whereas custom messages require both an active Python kernel and special ordering of function calls. Write logic that treats your
modelas the source of truth (see Two-Way Data-Binding Example). -
Use the browser console. View errors or intermediate values in your front-end code with the browser’s developer tools. Getting comfortable with the console will help demystify the front end and enable you to quickly debug your widgets.

-
Have fun. A primary goal of anywidget is to make it simple and enjoyable to create custom widgets. While it can serve as the foundation for a useful domain-specific integration, anywidget can also be used as a learning tool to poke around with the front end - or yet another way to Rick Roll your friends.
Little Things to Know
Here are some helpful things to know when working with widgets that aren’t always obvious.
Always specify names when using observe
When observing changes to a widget in Python, it’s tempting to write:
widget = MyWidget()
widget.observe(on_change)
This fires on_change for every traitlet change — including internal ones
you don’t care about. Since multiple traits often update together, your callback
may fire several times per logical change, causing glitchy behavior.
Instead, always specify which trait(s) you care about:
widget.observe(on_change, names=["value"])
Use ipywidgets.Output to see errors
Errors raised inside observe callbacks in Jupyter environments are swallowed
silently. Wrap your logic with an Output widget to surface them:
import ipywidgets

out = ipywidgets.Output()

@out.capture()
def on_change(change):
    # errors will now display in `out`
    print(change.new)

widget.observe(on_change, names=["value"])
ipywidgets.VBox([widget, out])