Introducing anywidget
By Trevor Manz
EDIT(2024-01-31): Since v0.9, it is preferred to use
anywidget lifecycle hooks
to define custom widgets. The JavaScript in the code snippets below have been updated to reflect this usage.
TL;DR: anywidget is a new Python library that greatly simplifies creating and publishing custom Jupyter Widgets. Unlike the traditional (cookiecutter) approach, with anywidget you 1) avoid fiddling with build steps and bundlers, 2) can prototype widgets from within a notebook, and 3) get a modern front-end developer experience. anywidget allows you to write code like this:
import anywidget
import traitlets


class CounterWidget(anywidget.AnyWidget):
    # Widget front-end JavaScript code
    _esm = """
    function render({ model, el }) {
      let getCount = () => model.get("count");
      let button = document.createElement("button");
      button.innerHTML = `count is ${getCount()}`;
      button.addEventListener("click", () => {
        model.set("count", getCount() + 1);
        model.save_changes();
      });
      model.on("change:count", () => {
        button.innerHTML = `count is ${getCount()}`;
      });
      el.appendChild(button);
    }
	export default { render };
    """
    # Stateful property that can be accessed by JavaScript & Python
    count = traitlets.Int(0).tag(sync=True)
… to create custom widgets that work in Jupyter notebooks, JupyterLab, Google Colab, VS Code, and more. No messy build configuration or bundlers. It Just WorksTM! Skip ahead.
Background
Jupyter Ascending
Computational notebooks are ubiquitous in data analysis and programming education. Jupyter is the de facto standard in the Python world, providing a web-based interface to execute code and embed computational outputs with prose or multimedia in a single document. Its modular design enables users to modify behavior and extend functionality to fit custom workflows.
Jupyter Widgets is the official framework to extend notebook output cells in the browser with interactive views or controls for Python objects in the Jupyter kernel. Custom widgets enable interactive data exploration and visualization during analysis. Widgets connect Python code to responsive and sophisticated user interfaces built with modern web technologies, bridging the gap between the web platform and Python ecosystem.
A custom widget is composed of two separate programs:
- Python code that runs in the notebook kernel
- JavaScript code that renders the widget in the browser and communicates with Python

The Multi-Platform Problem
With the rise in popularity of Jupyter notebooks, there are a growing number of ways
to view and execute .ipynb, including JupyterLab, Google Colab, and VS Code.
However, these notebook environments vary with regard to support for extensions,
specifically Jupyter Widgets.
In order to support Jupyter Widgets, each application implements its own mechanism to discover widget front-end code, then load and execute the JavaScript. This process is not standardized, in contrast to loading the associated Python program in the application kernel, and widget authors are thus tasked with packaging their JavaScript code for multiple notebook environments, each with its own requirements and quirks.
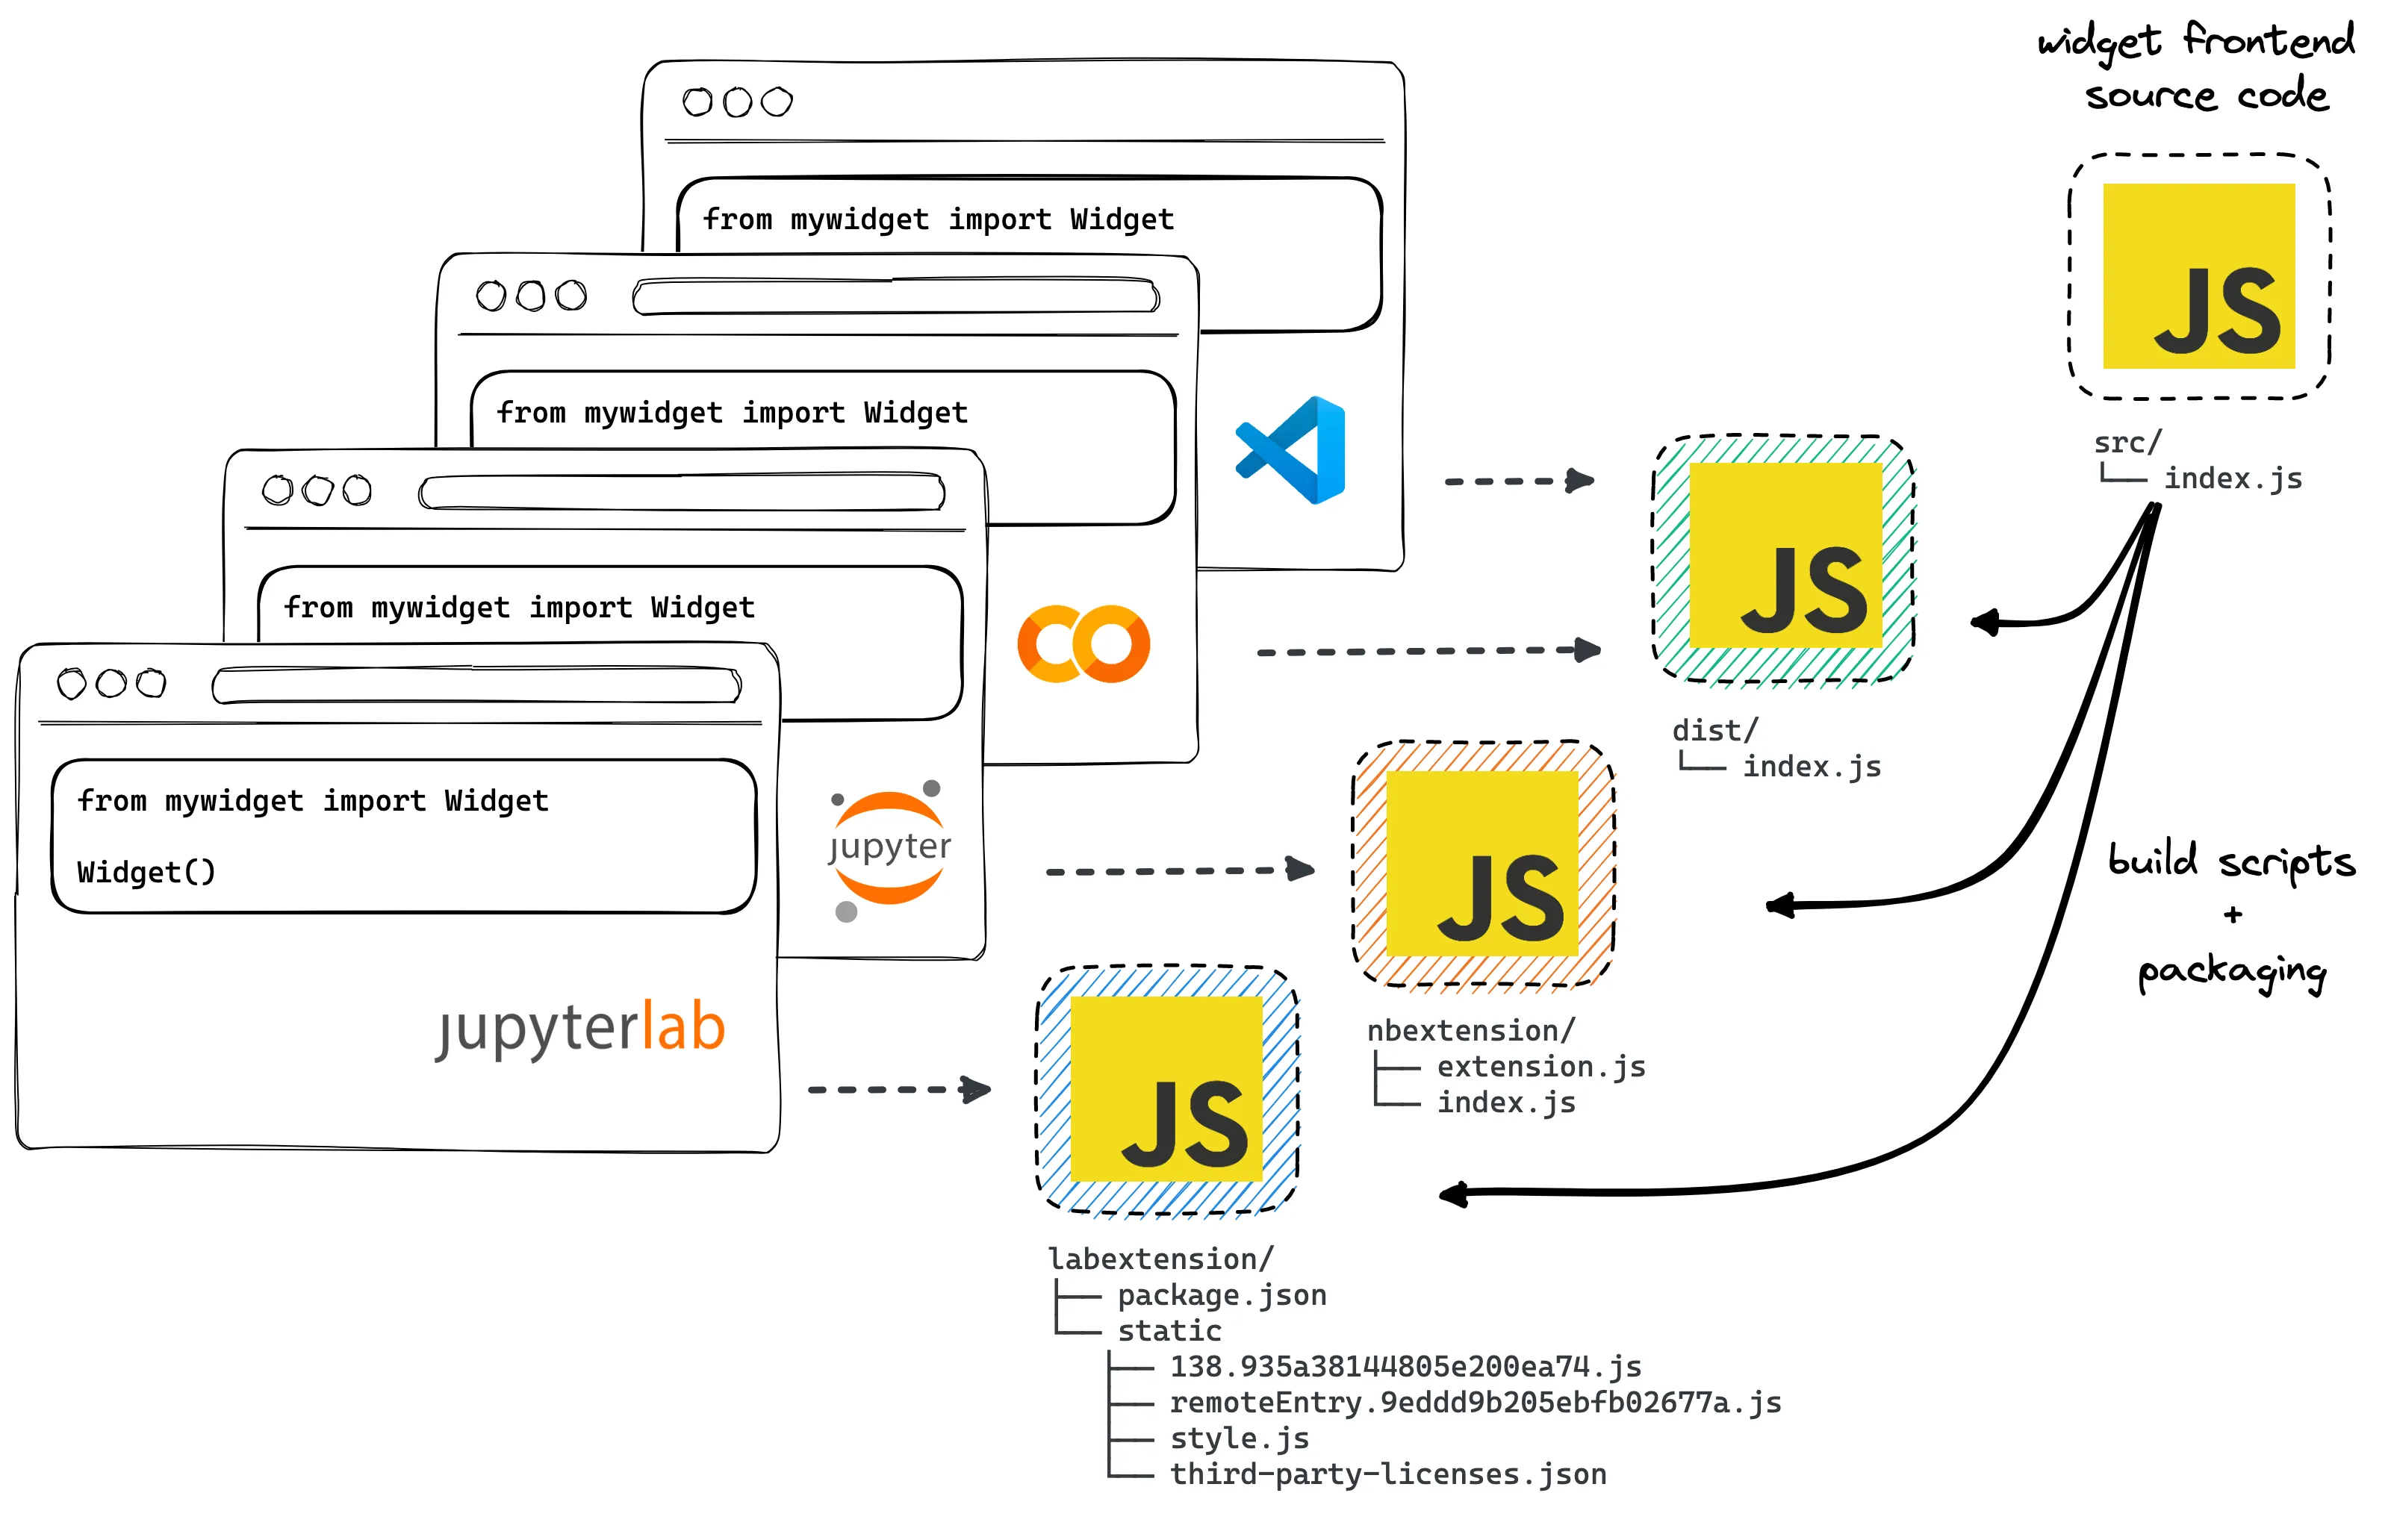
To a seasoned front-end engineer, this problem likely appears well suited for a JavaScript bundler, and it is. The issue is that every widget author currently solves the same multi-platform problem with bundling, and the solution requires long-term maintenance. Not only must the JavaScript tooling stay up to date with the fast-moving front-end ecosystem, but bundler configurations must be adapted to the latest – and mostly undocumented – requirements imposed by each notebook environment.
A Solution with Crumbs
To address this issue, the Jupyter team recommends an approach using
cookiecutters,
or recipes for creating new custom Jupyter Widgets. While the cookiecutters
initially ensure compatibility with Jupyter and multiple notebook environments, there
can be a steep learning curve for developers unfamiliar with the prescribed
front-end tooling (i.e., yarn, Webpack, Babel, ESLint, and Jest) and substantial
effort is still required to keep the inherited build system up to
date with the latest platform requirements.
Additionally, the recommended Python build systems
differ significantly between the official templates and are bootstrapped with
features which may or may not be required for a given project. For example, the
JavaScript-based cookiecutter uses (deprecated)
jupyter-packaging
(configured with setup.py + setup.cfg + pyproject.toml), whereas the TypeScript-based
cookiecutter uses the more modern hatch-jupyter-builder
plugin for Hatch (configured with pyproject.toml). Understanding
the differences requires knowledge of both modern JavaScript and Python packaging, and
rolling a solution from scratch is very challenging to do correctly.
In the end, the easiest path forward is to just pick a template and treat it like a blackbox … until something breaks.
For the curious reader, I created two separate projects for a
mywidgetpackage using the official cookiecutters and included the generated directories below.This section is not intended to critique the design choices by the Jupyter team and community members – these recipes are used widely - but to illustrate the large surface area a widget author is responsible for both understanding and maintaining after project initialization. For anyone who has used
create-react-app, it is reminiscent of runningreact-script ejectand vendoring all the build scripts.See all 19 files for
jupyter-widgets/widget-cookiecutterSummary
- Uses (deprecated)
jupyter-packagingbuild system (configured withsetup.py,setup.cfg, &pyproject.toml)- Uses Webpack to bundle multiple JavaScript targets
Command
cookiecutter https://github.com/jupyter/widget-cookiecutter.git@134946aOutput
mywidget
├── install.json
├── js
│  ├── amd-public-path.js
│  ├── lib
│  │  ├── example.js
│  │  ├── extension.js
│  │  ├── index.js
│  │  └── labplugin.js
│  ├── package.json
│  ├── README.md
│  └── webpack.config.js
├── MANIFEST.in
├── mywidget
│  ├── __init__.py
│  ├── _version.py
│  └── example.py
├── mywidget.json
├── pyproject.toml
├── README.md
├── RELEASE.md
├── setup.cfg
└── setup.py
See all 53 files for
jupyter-widgets/widget-ts-cookiecutterSummary
- 53 files
- Uses modern
hatch-jupyter-builderbuild system (configured withpyproject.tomlonly)- Uses Webpack to bundle multiple JavaScript targets
- Includes TypeScript, ESLint, Jest, Babel, codecov
- Includes documentation
Command
cookiecutter https://github.com/jupyter-widgets/widget-ts-cookiecutter.git@94f9d38Output
mywidget
├── babel.config.js
├── codecov.yml
├── css
│  └── widget.css
├── docs
│  ├── environment.yml
│  ├── make.bat
│  ├── Makefile
│  └── source
│     ├── _static
│     │  └── helper.js
│     ├── conf.py
│     ├── develop-install.rst
│     ├── examples
│     │  ├── index.rst
│     │  └── introduction.nblink
│     ├── index.rst
│     ├── installing.rst
│     └── introduction.rst
├── examples
│  └── introduction.ipynb
├── install.json
├── jest.config.js
├── LICENSE.txt
├── MANIFEST.in
├── mywidget
│  ├── __init__.py
│  ├── _frontend.py
│  ├── _version.py
│  ├── example.py
│  ├── nbextension
│  │  └── extension.js
│  └── tests
│     ├── __init__.py
│     ├── conftest.py
│     ├── test_example.py
│     └── test_nbextension_path.py
├── mywidget.json
├── package.json
├── pyproject.toml
├── pytest.ini
├── README.md
├── readthedocs.yml
├── setup.py
├── src
│  ├── __tests__
│  │  ├── index.spec.ts
│  │  └── utils.ts
│  ├── extension.ts
│  ├── index.ts
│  ├── plugin.ts
│  ├── version.ts
│  └── widget.ts
├── tsconfig.eslint.json
├── tsconfig.json
└── webpack.config.js
It is worth noting that this maintenance surface area is incurred for
every new project derived from one of the cookiecutters.
Besides the front-end packaging problem, a key limitation in the current state of Jupyter Widgets is that prototyping requires the creation and installation of a new Python package due to the mechanism by which Jupyter discovers widget front-end code. Prototyping must be done in either a classic Jupyter notebook or JupyterLab* where the custom widget extensions have been registered manually to each of these environments.
# mywidget/

# install the Python package
pip install -e .

# add extension to classic Jupyter notebook
jupyter nbextension install --py --symlink --overwrite --sys-prefix mywidget
jupyter nbextension enable --py --sys-prefix mywidget

# add extension to JupyterLab
jupyter labextension develop --overwrite mywidget

# rebuild the JavaScript when you make changes ...
yarn run build
This requirement creates a barrier to entry for many new Python
and JavaScript programmers. Whereas regular Python modules can be prototyped
in standalone .py files or even notebook cells and gradually transitioned to
pip-installable packages, widgets need to be pip installed from the beginning.
Finally, the front-end development ecosystem has matured rapidly over the last decade to enable instant, precise updates to client code without reloading the page or blowing away application state. Unfortunately, widget authors do not currently benefit from these advancements due to the legacy mechanism used by Jupyter front ends to load widget JavaScript. Instead, full page reloads are necessary to view changes applied to the front-end widget code and development feels sluggish compared to modern front-end applications.
In summary, Jupyter notebooks are ubiquitous and Jupyter Widgets is the standard framework to extend notebook output cells in the browser with rich, interactive views or controls for Python objects in the Jupyter kernel. However, the growing number of notebook environments has resulted in a fragmented ecosystem that assumes reusable widgets are only possible if widget authors:
- Learn and understand front-end build tooling
- Solve the same multi-packaging problem
- Create a new Python package before prototyping
- Use outdated web technologies for live development
*To my knowledge, it is not possible to develop custom widgets in Google Colab or VS Code since the JavaScript code must be published to
npm(and available via a CDN like https://unpkg.com).
ECMAScript Modules to the Rescue
The complexity involved with packaging custom Jupyter Widgets primarily arises from the need to transform a custom widget’s JavaScript to target the various module systems employed by different notebook environments. But what if this step could be abstracted away?
First introduced in 2015, ECMAScript modules (ESM) are now the official standard format to package JavaScript code for reuse. All major browsers support ESM natively, exposing a common mechanism to load and execute JavaScript. ESM wasn’t around when Jupyter and its derivatives were first created, but support now exists in all of these tools because they run in web browsers!
With ESM, the following code runs in all major browsers without modifications:
import * as d3 from "https://esm.sh/d3@7";

export function currentDate() {
  let formatTime = d3.timeFormat("%B %d, %Y");
  console.log(`Today is ${formatTime(new Date())}`);
}

currentDate(); // Today is January 18, 2023
Hello, anywidget
anywidget is a Python library that makes custom Jupyter Widgets easy. It is not a new widgets framework, but rather an abstraction around Jupyter Widgets that leverages ESM. anywidget is a traditional custom widget whose sole purpose is to both:
- solve the multi-platform problem
- load and execute ESM sent from the Python kernel
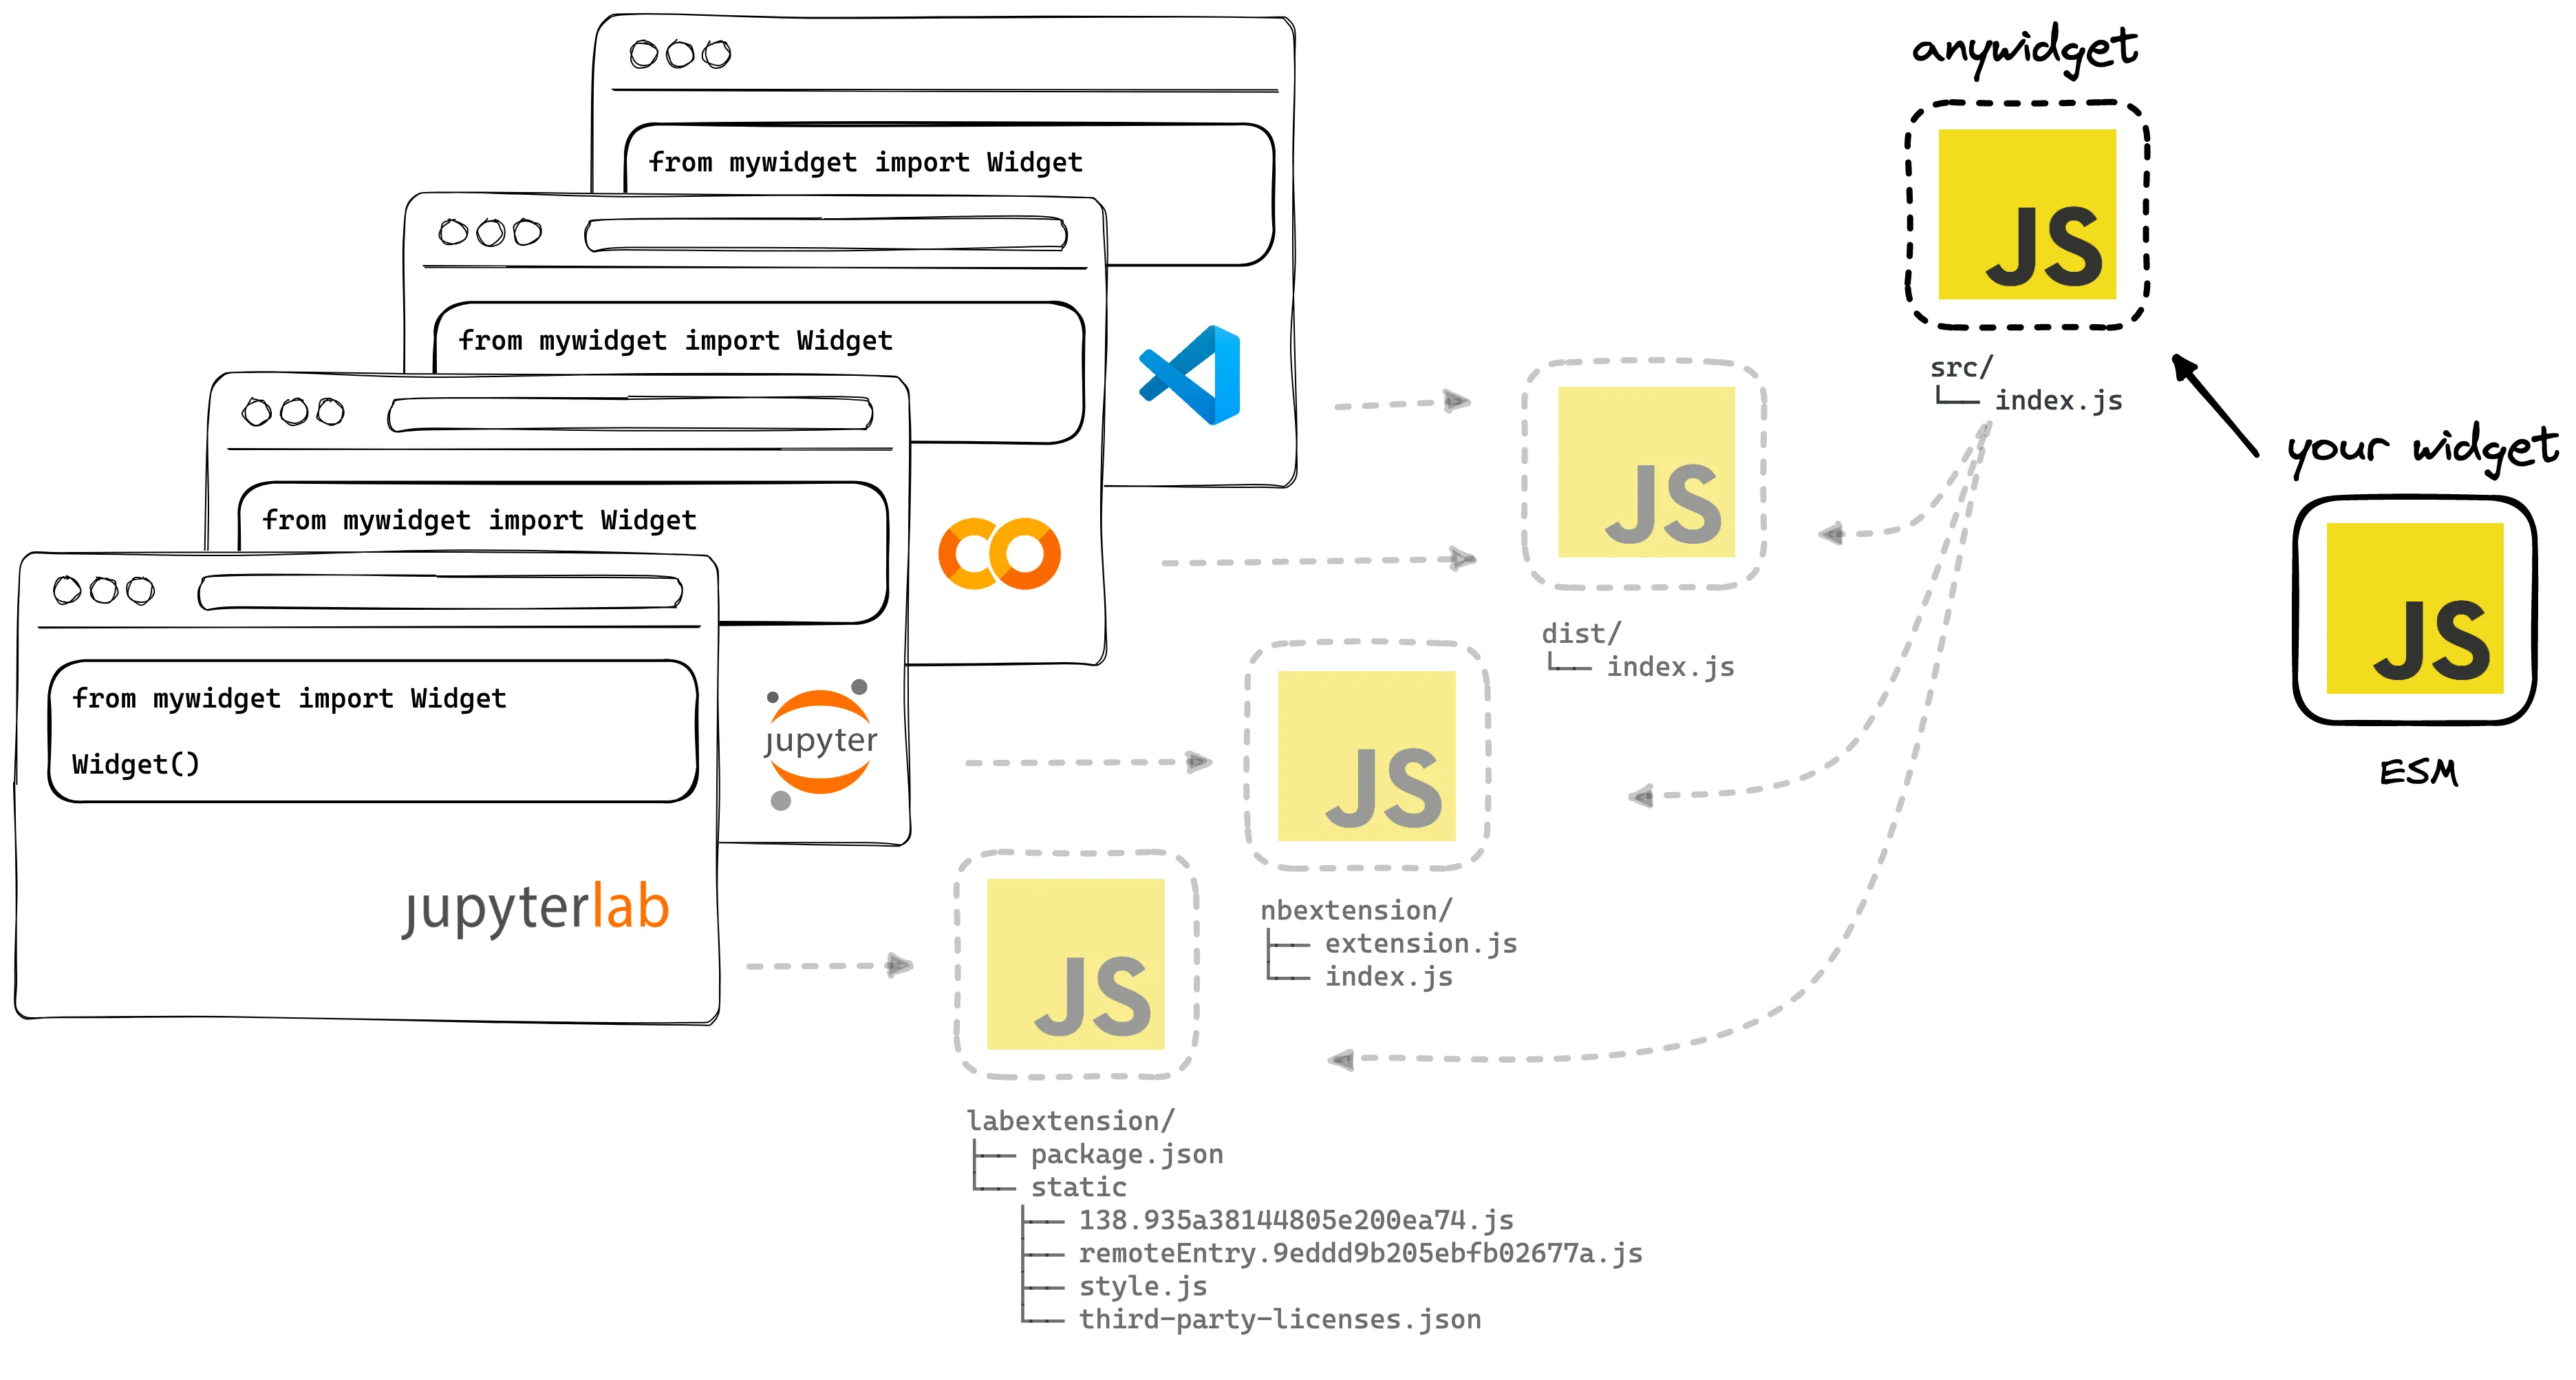
In this sense, anywidget is really a “meta” framework for creating new widgets. You – the widget developer – define ESM and an associated Python class (i.e., a Jupyter Widget), and anywidget takes care of the rest.
A consequence of this design is that it drastically lowers the barrier to entry for many potential widget developers. The data scientist with minimal JavaScript experience can begin prototyping her idea for a domain-specific Jupyter integration directly within a notebook (and also learn front-end). No need to first install Node.js and understand JavaScript tooling. Conversely, a front-end engineer can learn Python by turning one of their JavaScript libraries into a widget within Google Colab. No need to deal with virtual environments or learn how Python modules work.
anywidget also adapts to a wide spectrum of use cases, enabling prototypes to incrementally mature into robust Python packages. A student can save and share widgets via notebooks, while an engineer can package and version the widgets he’s created for clients and co-workers. As an anywidget project matures, the JavaScript code can be moved from inline strings to separate files to bundled assets when the complexity of the application demands it.
Lastly, since anywidget bypasses the various platform-specific module systems in favor of native ESM, users have the option to opt-in to an improved developer experience with modern front-end development tools. The Vite plugin for anywidget extends Vite’s development server with precise Hot Module Replacement support for Jupyter Widgets. Changes made to the JavaScript source during development are instantly reflected in the front end without refreshing or re-executing notebook cells.
Get Started
pip install anywidget
Using anywidget is exactly like creating a custom widget with ipywidgets,
except for where your widget front-end code lives. Custom widgets are defined by subclassing anywidget.AnyWidget:
import anywidget
import traitlets

class ExampleWidget(anywidget.AnyWidget):
    # anywidget, required #
    _esm = """
    function render({ model, el }) {
        el.classList.add("custom-widget");
        function value_changed() {
            el.textContent = model.get("value");
        }
        value_changed();
        model.on("change:value", value_changed);
    }
    export default { render };
    """
    # anywidget, optional #
    _css = """
    .custom-widget {
        background-color: lightseagreen;
        padding: 0px 2px;
    }
    """
    # custom state for the widget #
    value = traitlets.Unicode("Hello World").tag(sync=True)

ExampleWidget()
… and each subclass specifies:
_esmthe required ECMAScript module for the widget. It must define and export arenderfunction for view-based rendering logic and to initialize dynamic updates.
/** @param {{ model: DOMWidgetModel, el: HTMLElement }} context */
function render({ model, el }) {
  // Render model contents and setup dynamic updates
}
export default { render }; // export for anywidget
_cssan optional CSS stylesheet to load for the widget.
All custom stateful properties (e.g., ExampleWidget.value) are defined via traitlets
with the sync=True metadata – just like regular Jupyter Widgets!
Note: the
ExampleWidgetis a reproduction of the starter widget from the Jupyter cookiecutter, produced in a single file in ~20 lines of code. You can copy any paste this snippet into any notebook environment and run (or modify) the widget without additional installation or setup.
Examples
Two-Way Data Binding
The ExampleWidget demonstrates simple one-way data binding from the Python kernel
to front-end view. This example is slightly more sophisticated and synchronizes the
model state between the widget front end and the Python kernel (i.e., two-way data binding).
The render function creates a button element and registers an event handler
to increment count when the button is clicked. A second event handler
updates the text output any time count changes.
By treating the model as the source of truth, regardless of whether count is updated on the
Python side or the JavaScript side, the count displayed remains correct. You can learn more
about model view controller (MVC), the IPython widget framework
the front end relies on, in the Jupyter Widgets documentation.
import anywidget
import traitlets


class CounterWidget(anywidget.AnyWidget):
    _esm = """
    function render({ model, el }) {
      let getCount = () => model.get("count");
      let button = document.createElement("button");
      button.classList.add("counter-button");
      button.innerHTML = `count is ${getCount()}`;
      button.addEventListener("click", () => {
        model.set("count", getCount() + 1);
        model.save_changes();
      });
      model.on("change:count", () => {
        button.innerHTML = `count is ${getCount()}`;
      });
      el.appendChild(button);
    }
    export default { render };
    """
    _css="""
    .counter-button { background-color: #ea580c; }
    .counter-button:hover { background-color: #9a3412; }
    """
    count = traitlets.Int(0).tag(sync=True)

counter = CounterWidget()
counter.count = 42
counter
Third-party dependencies
Any valid ESM is supported by anywidget, so dependencies can be imported directly from a CDN via URL as long as they are also ESM. Browser support for modules means these imports are optimized and cached in subsequent requests.
import anywidget

class ConfettiWidget(anywidget.AnyWidget):
    _esm = """
    import confetti from "https://esm.sh/[email protected]";

    function render({ model, el }) {
      let btn = document.createElement("button");
      btn.classList.add("confetti-button");
      btn.innerHTML = "click me!";
      btn.addEventListener("click", () => {
        confetti();
      });
      el.appendChild(btn);
    }

    export default { render };
    """
    _css="""
    .confetti-button { background-color: #ea580c; }
    .confetti-button:hover { background-color: #9a3412; }
    """

ConfettiWidget()
Try It Out!
Today, I released anywidget v0.1. You can find it on GitHub and PyPI. To install, just run:
pip install anywidget
anywidget is new and still under active development. It should not yet be used in production since the API can change and some critical features are missing. With that said, it is already in use and ready for testing.
I hope using anywidget is simple and enjoyable. I have personally found it valuable in my work as a visualization researcher to quickly iterate on new ideas to interactively explore biomedical datasets.
If anywidget is interesting or exciting to you, please reach out and get involved on GitHub! Happy coding.